
What's on this page:
- When to use a lookup table to define variable values
- How to set up the lookup table file
- How to set up variables based on a lookup table
- Troubleshooting
When to use a lookup table to define variable values
Lookup tables can be useful to define embedded variable values when there are many possible values, and manually creating the rules for each would ordinarily be time consuming. A common use is geography: you can ask respondents to enter their ZIP code, and then assign matching regions, states, or cities based on a ZIP code mapping.
Note: the lookup table solution only works if value conditions are only based on one question. If values are based on answers to multiple questions (not just one), their conditions must be set up manually in the embedded variable configuration.
How to set up the lookup table file
1. Add the question that collects the value.
The lookup table matches against an answer given earlier in the survey, so that question has to exist first and sit ahead of the embedded variable in the survey flow.
2. Prepare your file.
Your file must contain at least two columns:
- Value to match: possible answers to the source question, one row per value
- Assigned value: what SightX should assign when that value is entered
File requirements and tips:
- The file must be in CSV or XLSX format
- Include a header row; the column names don't matter, but you'll use them to identify the columns after upload.
- Values have to match what respondents actually enter in the source question. Watch out for ZIP codes with leading zeros, which Excel drops unless the column is formatted as text.
- The value to match column should not contain duplicates.
Set up the lookup table
Step 1. Add an embedded variable to your survey build
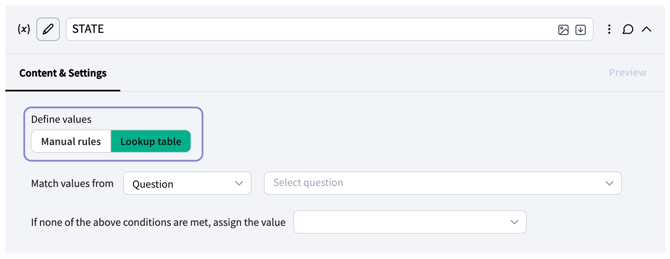
Step 2. Select the Lookup table method and choose source question
Under Define values, switch from Manual rules to Lookup table.
Step 3. Choose what to match on
Set Match values from to the type of object the response is sourced from (survey question, another embedded variable, etc), then select the specific question or variable in the second dropdown.
Step 4. Upload your file
Drag your CSV or XLSX into the upload area, or click browse and select it.
Step 5. Map your columns
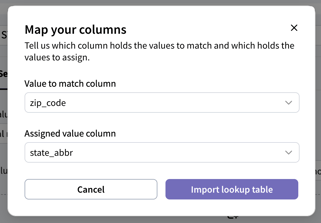
SightX reads the headers from your file and asks which column holds the values to match and which holds the values to assign. Set both, then click Import lookup table.
Step 6. Review the import
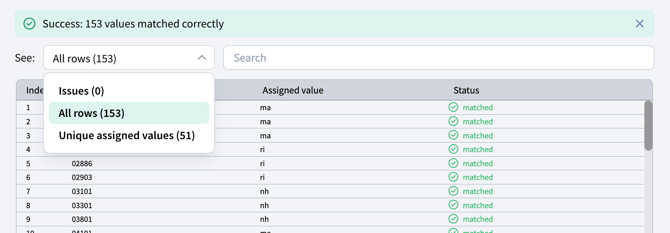
When the import finishes, a confirmation banner shows how many values were matched.
Use the See dropdown to review the results:
- Issues: rows that could not be imported or matched. Aim for zero here.
- All rows: every row in the file with its assigned value and status. Use the search box to spot check individual values.
- Unique assigned values: each distinct value your table assigns, with a count of how many rows map to it. This is a quick way to confirm your groupings look right, for example four regions rather than five because of a typo.
Step 7. Define what should happen when there is no match
In the dropdown If none of the above conditions are met, assign the value, choose what variable value should be assigned when there is no match in the table. Selecting "Other value" lets you type in a new value to assign, such as None or Unknown.